Simple One Serve Ayurvedic Veggie Kitchari Recipe (To make the perfect amount for just one bowl!)

Hello beautiful Wholesome Souls!!!

It’s been a few Moons since my last blog post here, and I tell you, it is SO beautiful and exiting – wonderful to be ‘back’ and sharing a super-duper practical and (in my opinion, and that of clients I have worked with over the years!), an essential recipe we ALL need in our Kitchens!

It is easy to make Kitchari for a group of people, there are a bunch of delicious and great recipes in my Ebook, ‘Simple Ayurveda in Your Kitchen’ (which has a lot of other goodies in there to inspire and support your holistic nourishment on a lifestyle level also!), however, they are for making Kitchari for 4 people, not for just 1, which often-times, if you’re single, or just making food for yourself one day, you most certainly need to have up your sleeve to avoid cooking too much (yay, no more leftovers!), and no more wasted food. Food is sacred and precious, and so are our resources and energy, the money we spend on our beautiful organic ingredients and food, SO — I am so excited to introduce to you (and yes, I will slowly bring out more ‘Single Serve’ recipes for you, and a little collection/Ebook focused just on this! Stay tuned for this), as I know you and I both need these ‘Single Serve’ recipes in our life! I got you! :)

For now, I introduce to you, the first of the ‘Single Serve’ Simple Ayurveda Wholesome Recipe collection with you!

Get your beautiful organic goodness and ingredients ready, put your favorite divine Vedic chants or other inspired divine music you love on – light a candle, say a prayer in your Kitchen for blessings of health and nourishment for you and your precious gorgeous body, and enjoy!!!

Before we get ‘into it’, I have some hot ‘One Serve’ Kitchari tips for you, that I think you’ll find helpful! :)

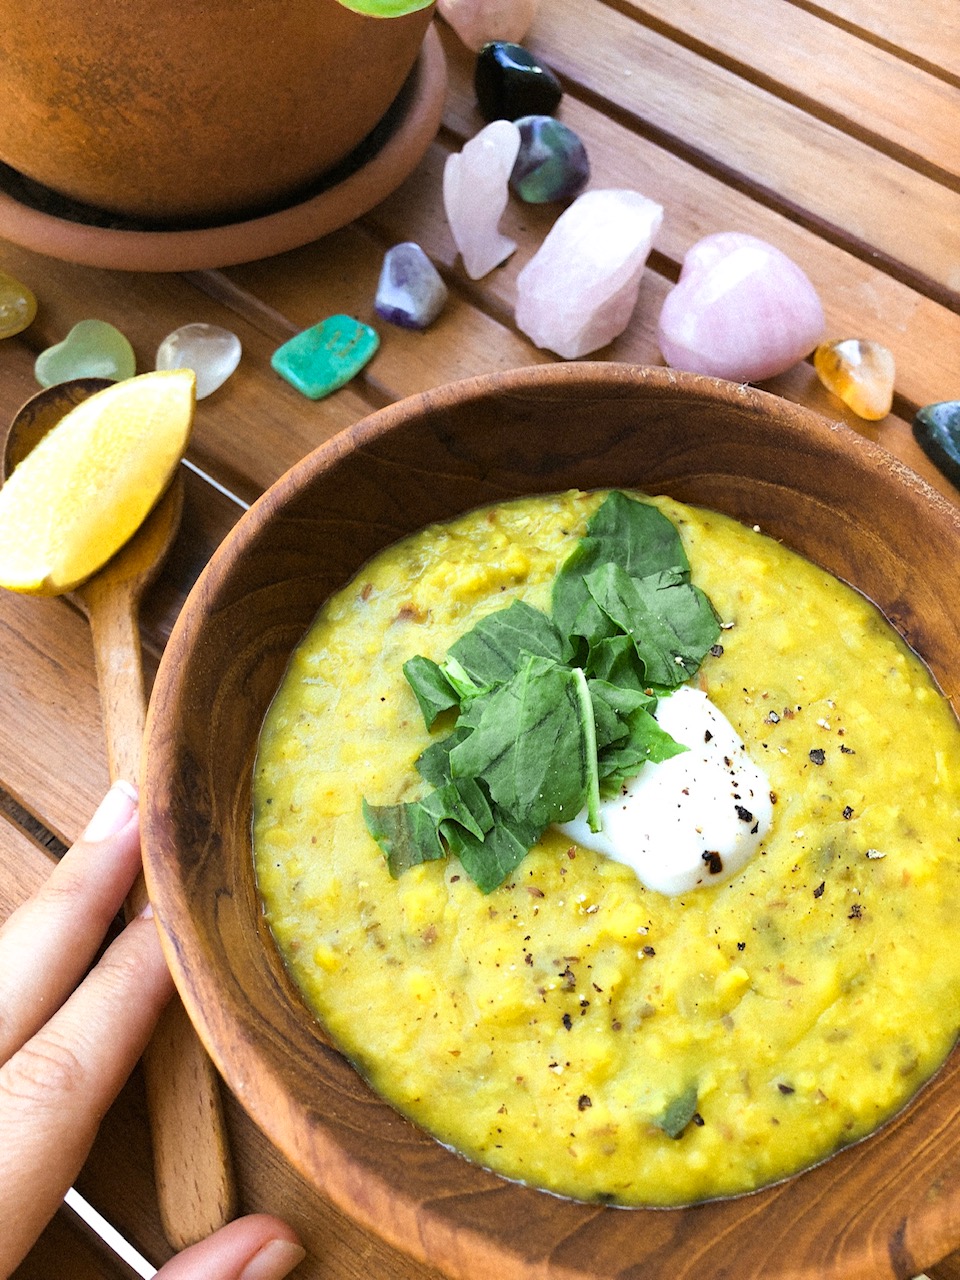
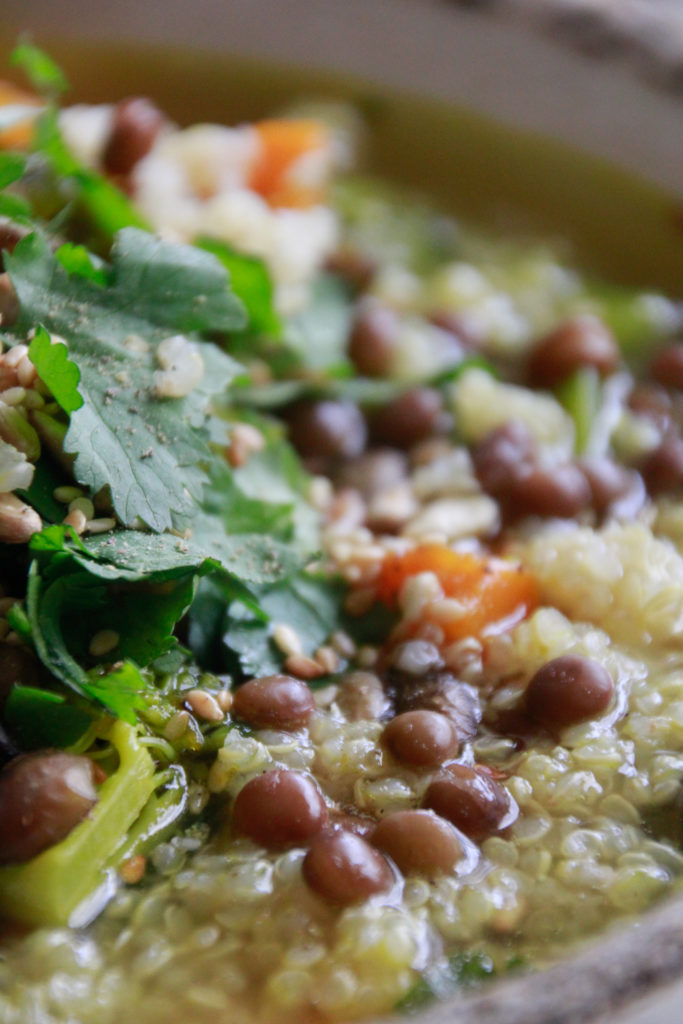
This recipe is for a super simple Ayurvedic One Serve Kitchari with spices, fresh coriander and your choice of seasonal veggies! If you wish to make it plain, without Veggies I recommend adding an extra tablespoon of rice so that it has a bit more substance and body! You can also make this with Whole Moong beans (they just require minimum 8 hours soaking) or Split Red Lentils.

My top Kitchari Veggie recommendations to consider are: Celery, Zucchini, Green Beans, Pumpkin, Carrot or Silverbeet / Spinach.

Simple One Serve Ayurvedic Veggie Kitchari Recipe

(To finally avoid food-wastage, left-overs which aren’t ‘ideal’ according to Ayurveda – for optimal cellular nourishment and digestion — AND, to  make the perfect amount for just one bowl! Yayyy!!!)

Ingredients:

  • 2 tsp of ghee or wholesome oil of choice***
  • 1⁄4 cup of Split Moong lentils or Red lentils soaked for minimum 30mins up to 8 hours and rinsed thoroughly
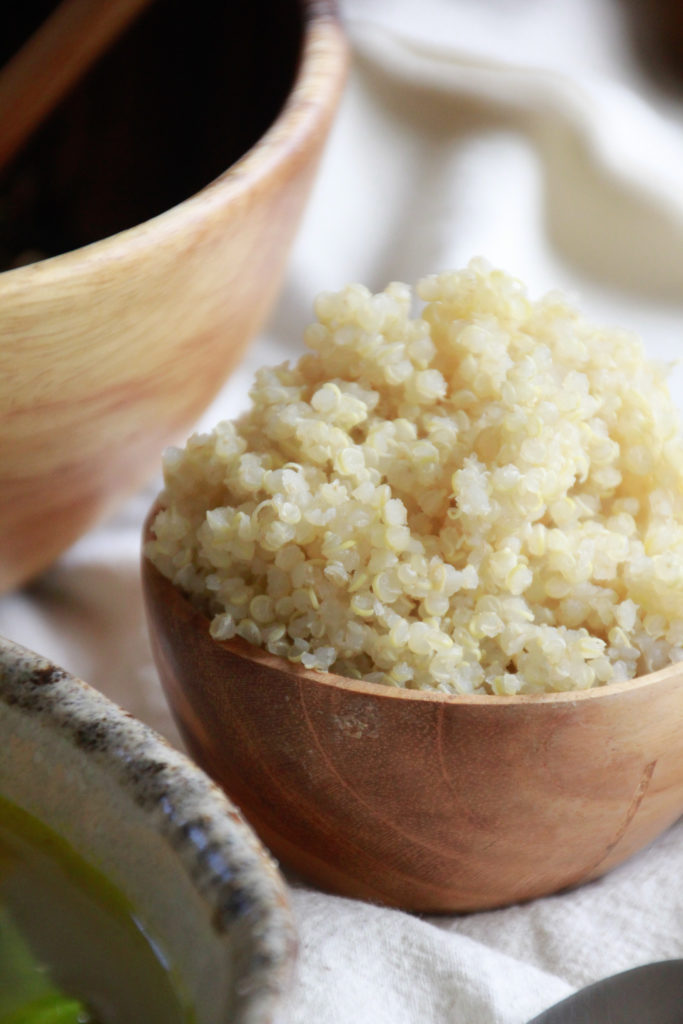
  • 2.5 tbsp basmati rice (or Quinoa) washed and rinsed 3 times
  • 3⁄4 cup of organic seasonal veggies of your choice (This isn’t hard and fast. Feel free to add a bit more or a bit less if you wish!)
  • 3 cups of ltered boiling water
  • 1⁄2 tsp cumin seeds
  • 1⁄4 tsp coriander seeds
  • 2-3 fennel seeds
  • Teeny tiny pinch of asafoetida (optional!)
  • 1 fresh or dried curry leaf or bay leaf (optional)
  • 1⁄2 tbsp fresh ginger grated or chopped nely
  • 2 tbsp nely chopped red onion or shallots (feel free to not be exact with this! A little more or less will still work well!)
  • 1⁄2 tsp of fresh garlic crushed or nely chopped
  • 1⁄8 tsp of turmeric powder
  • 1⁄8 tsp of quality sea salt
  • A few cracks of black pepper to taste
  • 1⁄4 cup of fresh coriander to garnish
  • A wedge of lemon or lime as a garnish to aid digestion
  • Optional dollop of coconut yoghurt and or homemade date or mango chutney on top as a garnish also!
  • Your love!

*Wholesome oils to choose from if on a Vegan/100% Plant-based Healing diet, (ie: not using Ghee): Cold pressed Sesame oil (for Vata & Kapha), Quality coconut oil (for Pitta) or cold pressed quality avocado oil (Suitable for Vata & Pitta). (If you’re not sure which is best for you and your body, reach out to book a consultation so we can establish a bio-individual set of recommendations specific to you!)

**Extra note for ‘cleansing’: if you feel a lot of heaviness and ‘heat’ in your body, this can mean that your liver is feeling burdened and needs a little break. If this is the case you may nd that sauteeing your spices and ingredients in a splash of filtered water, veggie broth or even celery juice can be a great substitute and allows for a little more lightness.

Creation process:

(Prior to starting the cooking make sure you have your two main ingredients; your soaked and rinsed lentils and also your rice, strained and ready to go in bowls next to your stove to save time and make your cooking process more efficient!)

  1. Take a medium saucepan and place it on your stove over moderate to high heat. Add your Ghee or Wholesome Oil of choice and allow it to ‘melt’ or to simply warm for a moment or two.
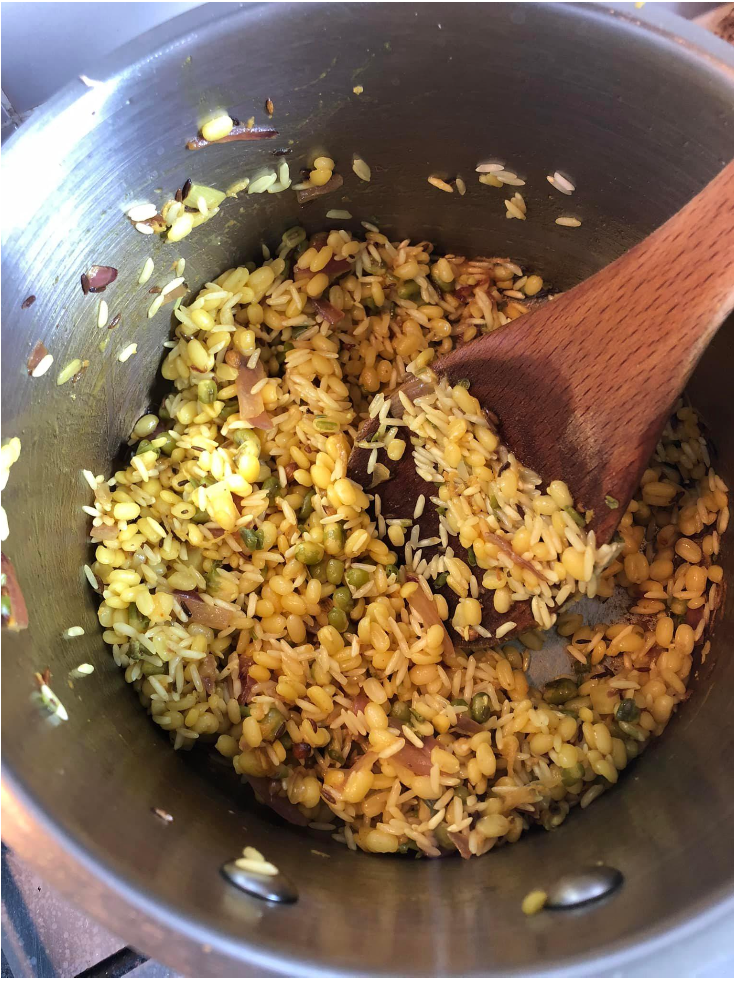
  2. Next add your Cumin seeds, Coriander seeds, fennel seeds and stir with a wooden spoon to allow the spices to toast and sizzle for a few seconds. Next add a teeny tiny pinch of asafoetida (optional) and a curry leaf or bay leaf (optional) and stir for another moment.
  3. Add your fresh garlic, ginger and onion and turmeric powder, stir for a few minutes all together and saute until the onion is coated in the turmeric, golden and lightly caramelized.
  4. Add your lentils and rice and stir regularly and vigorously for 3-4 minutes until well sauteed with the spices and onion and then add your ltered boiling water and stir to make sure there is no sticking on the bottom of the pot and to combine everything together harmoniously!
  5. Add your Veggies (unless you are only using leafy greens like silverbeet and spinach in which case I recommend adding them towards the end, once your Kitchari is almost fully cooked to avoid over cooking them.)
  6. Add 1⁄8 tsp of sea salt (or a little more to suit your tastes – essentially, a little pinch!), a few cracks of black pepper, your LOVE (of course) and a little handful of freshly chopped coriander and stir through.
  7. Stir and bring to a boil for approx 10-15mins or until your lentils and rice are creamy, smooth and fully cooked. Stir every 5 minutes throughout this process to create a beautiful creamy consistency and to make sure there is no sticking on the bottom. If you see that there is sticking feel free to add a little extra splash or two of boiling water intuitively as you see/feel.
  8. Once creamy and fully cooked, remove your pot of Kitchari goodness from the stove and let sit with a lid on for another 5-10mins to allow the avours to deepen and the Kitchari to settle and become even creamier. This step is optional, if time permits I recommend it though!
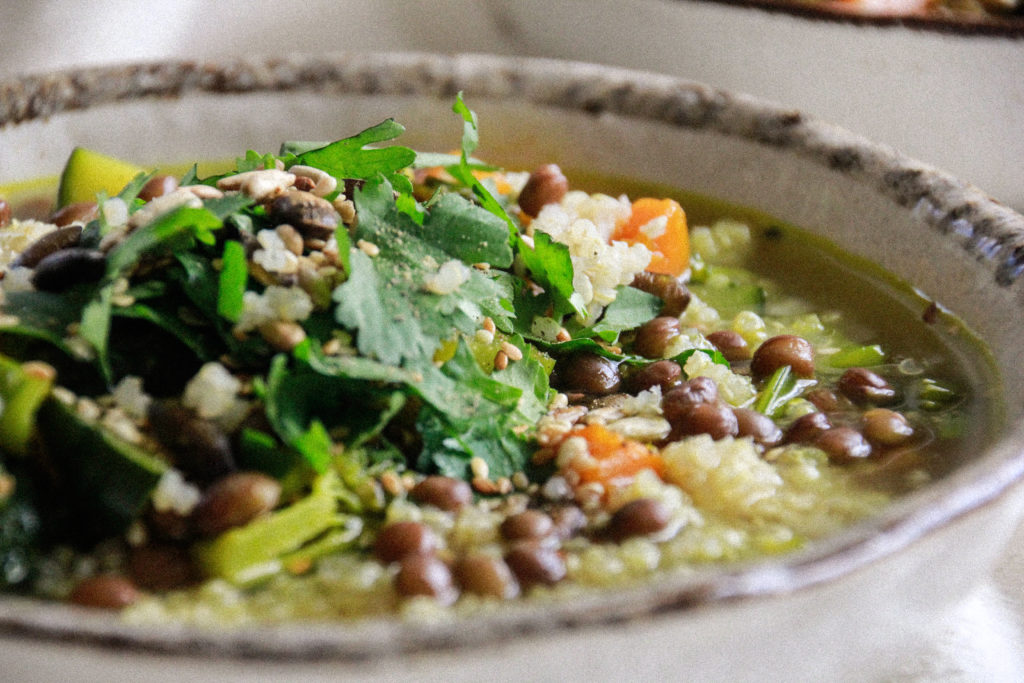
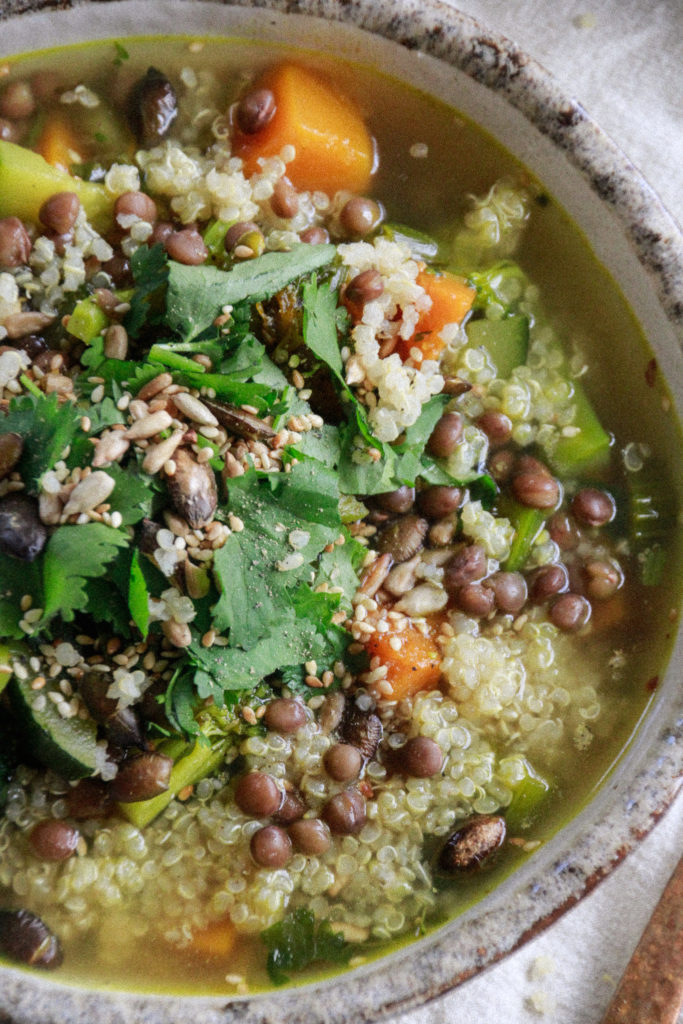
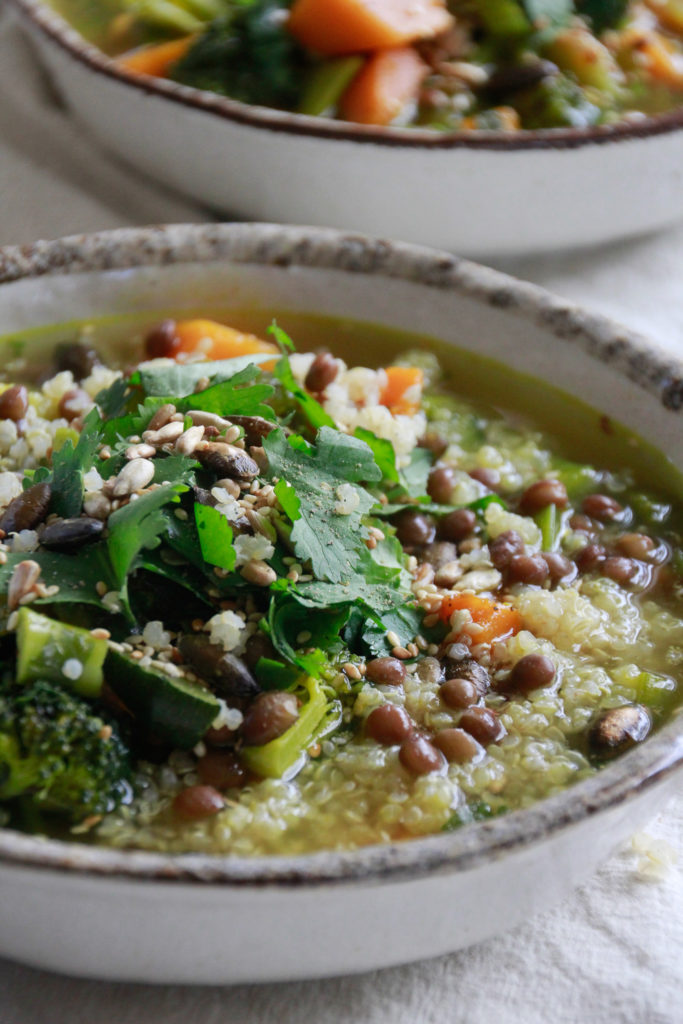
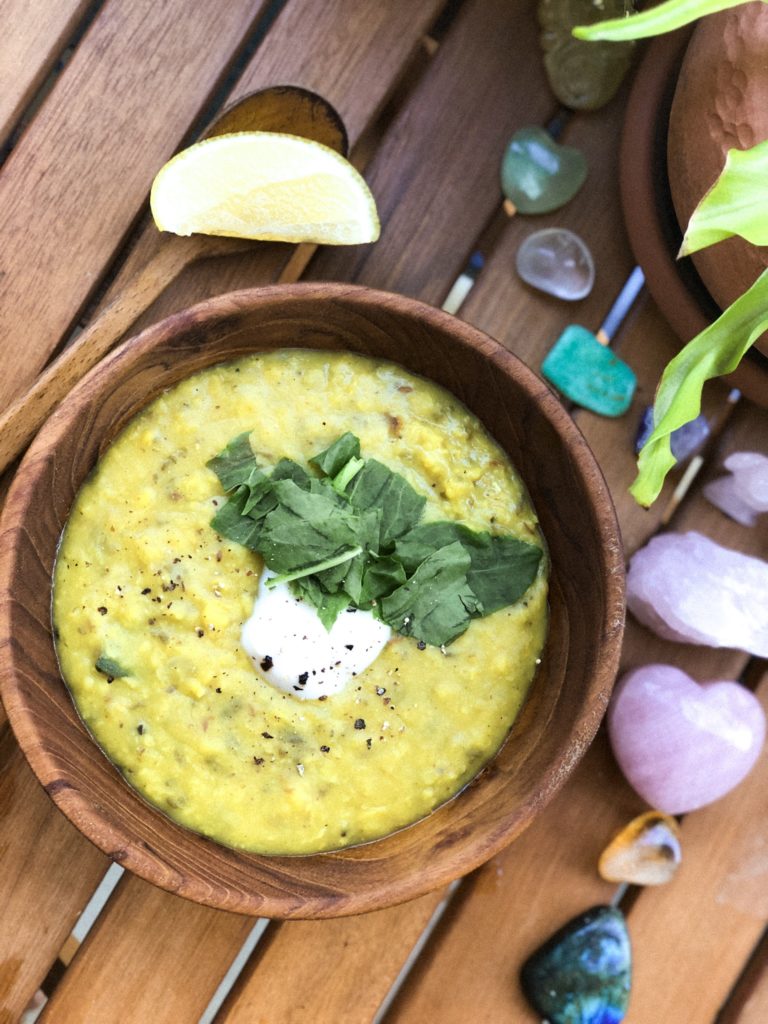
  9. Your Kitchari is ready! Serve in your favourite bowl, add a generous garnish of fresh coriander on top, a squeeze of fresh lime or lemon juice to aid digestion and an optional dollop of coconut yogurt and home-made mango chutney (I have an amazing simple, yummy and sugar-free recipe for this that I shall post on the blog for you soon!) – as well as some extra salt and black pepper to taste and enjoy!!!

With immense love, joy, gratitude, blessings and prayers of goodness to you in your Wholesome Kitchen!!!

Aummm Shanti!

x Lorien

Wholesome & Feel-good Spring Lentil Veggie Soup Recipe!

Bowl of wholesome Spring lentil veggie Soup goodness!Ahhhh, it’s Spring – and such a beautiful, lush and refreshing Spring season it has been so far here in Australia right now too!

In Ayurveda, seasonal change is considered a magical and potent time of the year for giving extra love and nurturing to our beautiful bodies and from a digestion point of view – to focusing on foods that are ‘light’, ‘warm’ and ‘easy-to digest’, so that our body can devote energy to it’s natural seasonal change processes of cleansing, adjusting and aligning for the next season ahead!

So, when it comes to giving the body a little extra space, energy and warmth-filled-loving goodness to support our digestion and our immune system during seasonal change… the solution is Souper Simple! (I just had to go there! hehe) …If that pun didn’t give it away, the solution is, drumroll, yes you guessed it… Soups! Soups my friend are our Seasonal transition best-friend, and are a beautiful way to incorporate the potent, nourishing and ‘deliciousafying’ qualities of healing Ayurvedic kitchen spices and herbs into our cooking too – for literal added goodness!

In seasonal Soup fashion ~ I have personally been living off Soups in my Kitchen lately, since the seasonal change, making some of my staple go-to healing soup favourites from my E-book, as well as creating some fresh new yummy Soupy-goodness filled recipes and today I am so excited to be sharing one of my favourites at the moment, with you!

The Soupy downlo’ on this fresh new recipe…

If you have my E-book, you’ll see that this recipe is very similar to the ‘Sunshine Veggie Soup’ recipe in there that you are most likely familiar with (I think it is THE most commented upon recipe from the book! It’s popular, and for good reason!) It’s definitely one of my all time favourite go-to’s as it is not only packed with my favourite Vegies, but it literally feels like sunshine in my body when I eat it too, (hence the name!)

This new recipe I have for you today, has all the qualities I love about the ‘Sunshine Veggie Soup Recipe’, with a little extra! The two new main ingredients being; whole red lentils for added protein, fibre and oomph! And, fluffy steamed quinoa for extra protein and heartiness! Yuummm!!! (It’s so good, I’m excited for you to try it!)

The combination of healing Ayurvedic spices, vegies, lentils and quinoa (let alone garnishing with some yummy crunchy toasted seeds – also from my E-book) is…. Let me just say, simply Super (or Souper!)-duper wholesome, nourishing and feel good!  It feels DIVINE in my tummy, and I hope in yours soon too!

This Soup is a ready to go meal all in one, and I feel confident that you are going to LOVE it and fall in love with making it a staple go-to wholesome feel-good Soup recipe in your Kitchen also! Yay!!!!

A few more reasons to love Soup during Seasonal transition (and in life in general!): 

  • Soups are an amazing nourishing staple, they are simple, quick, easy to make and nutrient packed!
  • They are warming, light, high in fiber from Veggies and or lentils/legumes and generally speaking – are easy to digest for the body due to their warm, soft and smooth qualities!!!
  • They are easily customisable and adaptable and are a great meal to make when you’ve only got a few veggies left in the fridge!
  • You can make Soups in advance so that you have a nourishing wholesome meal for lunch or dinner ready to go on days when you’re busy and need something quick!

…Basically, what’s not to LOVE about Soups!!! …I love them SO much!

So, without further adieu, let’s get straight into the Recipe!

little line with graphic of a bowl of soup

Wholesome & Feel-good Spring Lentil Veggie Soup Recipe! 

Wholesome Vegie Lentil Soup Recipe with Ayurvedic Spices and ingredientsIngredients:

  • 3 tbsp of Ghee, Coconut Oil or Avocado Oil
  • 2 tsp of Cumin seeds
  • 1 tsp of Coriander seeds
  • A pinch of fennel seeds
  • 2 tbsp of fresh ginger finely chopped or grated
  • 1 cup of finely chopped red onion (or shallots!)
  • ½ tsp of turmeric powder
  • 1 cup of celery finely chopped
  • 3 cups of small – medium cubed pumpkin
  • 2 cups of zucchini cut into quarters
  • 2 cups of broccoli chopped into little florets (little trees!)
  • Approx 10-12 cracks of black pepper from your pepper grinder!
  • ½ tsp of sea salt
  • 1 cup of fresh coriander finely chopped
  • 1 cup of whole red lentils (ideally soaked overnight, or at least for 1/2 a day prior to cooking!)**
  • 1.5 cups of *cooked* whole Quinoa (white or tri-colour will work perfectly!)
  • Your love! (…Obviously, the *most* important ingredient, always! :)

**Note: A common question about the ‘Whole Red Lentils’, in this recipe is ‘Why do they *look* like ‘brown lentils’? The answer is that ‘Whole red lentils’ infact don’t actually look ‘red’ as their name suggests, they look ‘brown’ (like you can see in the photo’s here)!  Also, if you don’t happen to have ‘Whole Red Lentils’ in the pantry as you’re reading this and are wondering what you can swap them for, you can easily use ‘French Green Puy Lentils’ instead and you’ll find they have a similar cooking time so you can follow the exact same steps!

Simple Creation process in 3 Stages:

This dish is simple, however within it’s simplicity, there are 3 key stages of preparation for it then all come together with the click of your fingers that I’m going to walk you through step by step! …There’s preparing the Lentils, preparing the Quinoa and then preparing the Soup herself! (If you already have lentils and quinoa prepared by chance, you can skip right to the bottom to making the core of the Soup straight away!)

Stage 1: Preparing your lentils… (as they require the most preparation!)

The first step and step that requires the most pre-thought and preparation is soaking and cooking the lentils. There are a couple of different ways to do this.

Lentil Cooking Option 1: If you own a pressure cooker (I recently started using an ‘Instant Pot’ pressure cooker for the sole purpose of cooking beans and lentils quickly!) then you can simply soak your lentils overnight or for at least a couple of hours, and then pop them in your pressure cooker with a bay leaf, pinch of salt and pinch of asafoetida and then cook for 10mins! After 10mins, voila, your lentils will be perfecto and ready for the soup!

Lentil Cooking Option 2: If you don’t have a pressure cooker (I didn’t for years also!) then you can cook the lentils on the stove in water for approx 50mins until they are soft, again with a bay leaf, a pinch of salt and a pinch of asafoetida. So, these are the lentil preparation options.

Bowl of Steamed Organic QuinoaStage 2: Preparing your steamed Quinoa

This step is super simple. If you’re familiar with cooking quinoa, then all you’re going to do is cook quinoa the way you know how. If you’re new to cooking beautiful fluffy quinoa then I have some instructions for you below:

How to cook beautiful fluffy Quinoa in 2 easy steps:

Step 1: Take a pot, place 1 cup of quinoa inside the pot, and fill the pot with water to rinse the quinoa and wash it, to help remove the ‘saponins’ that are naturally on the outside of quinoa and make it yummier and easy on the digestive system. Rinse your quinoa in the water a couple of times, use a fine mesh strainer when pouring the water out to prevent losing any little quinoa seeds and then place on the stove.

Step 2: Add 2 cups of filtered boiling water from the kettle (this will just save you a bunch of cooking time!) and a pinch of sea salt, place the lid on the pot and then bring to a boil! Once it comes to a boil, turn the heat down to low and let it cook with the lid still on for 15mins. After 15mins turn the heat of completely and let the quinoa sit with the lid still on (to utilise the steam) for another 5 mins before serving. The result will be beautiful gorgeous fluffy Quinoa! Yum!

Okay, now let’s get onto making the heart and soul of this soup – the warming, healing ~ liquidy Vegie goodness!!!

Wholesome Lentil Vegie Soup Recipe Close UpStage 3: Now, to make the Soup! (this is the quickest part, your Soup will be ready within 20-25mins!)

1. Warm your Ghee or oil in your pot, then add your Cumin seeds, Coriander seeds and fennel seeds. Allow to saute for a few moments until you see the spices release little tiny ‘bubbles’ around them (a sign of them releasing their healing volatile-oil goodness into the pot) and then add your finally chopped garlic, ginger and onion.  Stir and saute for a few minutes to soften the onion and allow the garlic and ginger to become yummy and then add your turmeric powder and continue to saute and stir until the onion is soft and caramelised.

2. Add your celery and stir for a few minutes, allowing the celery to soften and meld with the other ingredients already in the pot. Next, add your pumpkin, and stir for a few minutes to give it a head start before then adding the rest of the vegies. Next add the rest of the vegies; the zucchini and broccoli and stir.  Add your hot water from the kettle, a generous amount of ‘black pepper’ from your pepper grinder (or approx ‘12’ cracks!), sea salt and some fresh coriander. Allow to cook for approx 20mins or until the pumpkin is soft and tender. When the pumpkin is soft, you know your soup is done!

3. Scoop your drained and cooked lentils into the Soup and stir to allow the lentils to merge with the vegies.  And then optional is to add a few spoons of quinoa to your soup (this is really delicious) OR leave the quinoa as a side to enjoy adding to the soup as you eat it, like dipping bread into your soup, but it’s fluffy quinoa instead!

And your Soup is done!!!

Serve with some crunchy toasted seeds, fresh coriander, a little pinch of salt and a few more cracks of black pepper to suit your taste.

Enjoy and relax while eating… put some soft music on in the background, light a candle or two and take a moment to ‘center’ your mind and body before your first bite. When we do this before a meal we are relaxing the nervous system, which in turn relaxes the digestive system. This prepares the body to digest the divine food we are about to bring into our precious body optimally for great digestion and our ultimate Nourishment!

…Yum! Enjoy in bliss and if you make this recipe and love it please let me know on instagram, facebook or even good-old email (lorien@wholesomelovinggoodness.com) ! :) I love hearing from you and seeing your creations! 

With love and joy to your home and family from mine!

Blessed and blissed nourishing!

x Lorien

P.S. If you’re feeling inspired to take your personal inner and outer nourishment and self-care to a whole-new delicious level, you might love my self-paced signature 6-Week Ayurvedic Food & Lifestyle transformation program, ‘Simple Ayurveda in Your Kitchen’!

It’s a juicy course to support you in not only becoming a creative intuitive genius in the Kitchen, with making staple wholesome Ayurvedic dishes for yourself and your family, but to also empower you to implement Ayurveda’s foundational healing wisdom and magic into your modern daily life! The wholesome doors to the program are opening for enrolment again soon, so if you’re ready to take your nourishment to a new level I highly recommend you join the ‘Waiting list’ here so I can let you know when enrollment opens for the last time this year!

Yes please, I’d love to find out more and join the Waiting list!

x

Wholesome vegan lentil veggie soup recipe

Wholesome 7min Carob Easter Truffle Balls Recipe!

It’s Easter 2021!!! Yay!!!

…And, it has been many many moons since my last blog post here!

(To go straight to the recipe, scroll below!)

…The moons we all experienced in 2020, over the last year certainly presented new and challenging situations for humanity, and each one of us to navigate and grow through – as a global family, we are very much still navigating and traversing these challenges and new approaches to how we live and go about our day-to-day lives, and this humble little blog had a little ‘2020’ hiatus of sorts as I navigated the changing world and took time to engage in further study, training and creative ‘offline – time’!

It feels so incredibly good to finally be back to the blog, sharing a fresh wholesome and brand new recipe with you!

And, while this post is actually about this delicious – lush and wholesomely scrumptious new recipe, I couldn’t go ahead and get straight into talking about it, without first saying a proper ‘Hello’ once again and acknowledging how good it feels to be back here, sharing on this humble little page with you.

I also hope this finds YOU and your loved ones well, thriving and finding nourishment in life’s daily magical moments and miracles!

…So, let’s get into this recipe!!!

Lush, chocolatey (though it’s really ‘caroby’), decadent tasting and yet unbelievably simple in both ingredients AND preparation.

If you have been looking for a wholesome, quick, simple, easy and feel-good choccy Easter treat to make for yourself, your friends or your family – look no further! :)

Full disclosure. I came up with this recipe in a hurry, when looking in my pantry and fridge for ingredients that I could make a ‘treat’ out of to bring to a girlfriends place for a Women’s circle I was going to. I had only 10mins before I had to leave the house. I had had a really full day, didn’t have anything pre-prepared and was unsure of what I could pull off in just 10mins – and definitely didn’t want to arrive to this beautiful gathering empty handed!

…What happened next was a foody’ miracle’, (hehe), and – the ‘birth’ of this here recipe!

Dramatic language I know, but I’m honestly so excited about how simple and obvious this lush truffle recipe is that I am actually not afraid of sounding over the top and dramatic about it at all! :)

Medjool dates – Tahini – Carob – Cinnamon – Salt AND woman-power (my/your hands!)

With no time to get the food processor out, (and no need as if you’ve ever eaten a Medjool date you will know how soft and sumptuous they are!) I quickly removed the pit’s from my dates, combined these 5 core ingredients together in a bowl, and with clean dry hands proceeded to massage everything in the bowl together, into one luscious datey-caroby-tahine-y clump, and then into a dozen bite sized lush truffle balls to take with me!

The result…. A batch of lush, truffle-like, chocolate-free, sugar-free, no-fuss and super lush and delicious (…every woman at the circle asked for the recipe!) wholesome treats.

Treats that take only 6 ingredients. Require zero food processor (unless you prefer to not get messy with your hands). Can be made in less than 10mins AND, most importantly, that feel sooo lush, you may even say that if they were covered in a chocolate coating they would be a modern day wholesome Ferraro Rocher! (Btw, I’ve tried them covered in home-made raw chocolate, and it is amazing too!)

Without further-adue, let’s get Wholesome Easter Carob Truffle ball rolling!!!

First, a few key tips, before you get ball-making: 

  • Make sure your hands are clean and dry as we are about to combine everything with your hands!  …Yes, no food processor needed, just your beautiful bare hands. …This part is a little messy, however so deliciously fun, tactile, creative-feeling, time saving, dish-saving (yay for not having to clean the food processor after!) and no-fuss!
  • Carob powder like any powder can naturally get a little ‘clumpy’. Before adding your Carob powder, have a look at your powder and if you notice any lumps take the back of your spoon and gently ‘smoosh’ them out, so that your powder will blend and mix seamlessly when you get to mixing and combining everything with your hands! 
  • If you are not into the idea of using your hands to make this mix, (I get it, it’s messy and definitely not everyone’s thing!) you can absolutely use a food processor to do it all instead, and they will still be super delicious and luscious! :)

Wholesome Carob Truffle Balls Recipe!

(Make approx 15 balls!)

Ingredients:

  • 20 Medjool dates (with pits removed)
  • 3 tbsp Hulled Tahini (unhulled will work fine also, but just have a richer/earthier taste!)
  • ¼ tsp Sea Salt or Himalayan Salt
  • 2.5 tbsp Carob powder (you could use Raw Cacao powder instead if you’re not a Carob lover or don’t have any Carob in the pantry!)
  • ½ tsp Cinnamon powder
  • 4 tbsp of desiccated or shredded coconut (for rolling them in at the end!)
  • Your love!

Creation process:

Step 1 – Making the mix:

  1. Remove the pits from the inside of 20 Medjool dates and place the dates in your favourite bowl.
  2. With clean, dry hands, use your hands to ‘massage’, soften and ‘squish’ the dates into one another.
  3. Next add 3 tbsp of Tahini, ¼ tsp of Sea salt, 2.5 tbsp of Carob powder and ½ tsp of Cinnamon powder to your date bowl and begin to combine (this is where it get’s a little rustic and messy, but so fun!) all ingredients together with your hands by massaging the tahini, carob, salt and cinnamon into the dates for 1-2mins or until you feel they are well combined. Put your love into the mix and enjoy this creative, tactile and up-close and personal moment with your delicious ‘truffle ball’ mix! It can feel really therapeutic, stress relieving and like a lovely foody-meditation! :)

Step 2 – Rolling your truffle balls:

  1. Take a small piece of your mix in your hand and roll it into a little ball with the palms of your hands until it is nice and compact, and a beautiful round sphere shape!
  2. To coat the balls in shredded coconut, place your shredded coconut in a small bowl and roll each truffle ball into the coconut until satisfactorily covered! :)
  3. Repeat this final step for each ball and ~ they’re ready to be served!!! Yay!!!

Pro tip: If you have a little more time up your sleeve, place them in the fridge for 10-20mins to let them harden a little before serving. (Doing this gives them a crazy ‘caramel-snickers-bar’ like texture that might really help hit that nostalgic chocolate bar–craving spot! :)

Yay!!

Enjoy!!


“We are not going in circles, we are going upwards. The path is a spiral; we have already climbed many steps.”

~Hermann Hesse


~~~

Wishing you and your loved ones a magical happy Easter and I hope this simple – yet super lush Wholesome Carob truffle treat recipe hits your yum-spot and inspires some relaxed, meditatively-messy hands on fun in the Kitchen these holidays!

And, as Mr.Hesse says in his quote above… Though we are living in some wild and uncertain times, we must have faith that we are ‘not going in circles, but that we are infact going upwards!’ May we keep ourselves nourished and have faith in life and one another’s goodness, always!

With love,

x Lorien

Wholesome & Easy Ayurvedic Beetroot Garden Vegie Patties Recipe!

Gluten Free Ayurvedic Beetroot Protein Patties Recipe

A quick and wholesome lunch, simple dinner, savoury hearty breakfast or an on-the-go wholesome snack / plant-based meat-free alternative to bring to your next family event or Aussie bbq!

These delicious morsels of love are one of the MOST exciting, simple and yummy vegie-licious wholesome recipe creations to be born out of the Wholesome Kitchen!

I first developed this recipe for one of my clients who came to see me for holistic Ayurvedic Wholefood nutrition support for a series of health challenges he was experiencing. He needed a recipe that was quick and easy to make (as he travels a lot, is busy and ussually is just cooking for one), nourishing and nutrient dense, gluten-free, dairy-free, egg-free, nut-free and that was something he could eat that had ‘texture’ so he had the experience of biting into something, along with enjoying the delicious soupy Kitchari’s and Soups that I gave him to have also.

…The result, HE LOVED them, and so did I! 

These patties hit the ‘Pattie spot!’ (if that’s even a thing!), and when you try them at home also, I think you’ll find they hit your ‘Pattie spot’ also! (…Please do email me to let me know!)

Since this recipe came into being I have made it a personal staple in my weekly Meal planning and have enjoyed these beauties for Breakfast, Lunch and Dinner at various times throughout a week!

I recommend serving these Patties with some fresh organic leafy greens dressed with a little olive oil and lemon or apple cider vinegar. So yum!

These Patties can also be enjoyed as something ‘substantial’ with a light evening soup or with a little chutney as a yummy tasty snack!

As this recipe takes less than 15 minutes to make for one person (as a quick ‘what should I take for lunch today’ meal! …don’t worry, we all have those moments!) I have written this recipe to be the perfect amount for ONE single person to make, with no excess/no wastage and so it’s something you can easily follow for making yourself  a quick meal when needed!

If you wish to make a larger batch for an event, a gathering, for the week and or for the whole family, you can simple double, triple or quadrouple the quantities to make it suit your desired situation and how many you wish to cook!

So, without further adue… here is the recipe for the worlds most divine, mourish, tasty, wholesome, Ayurvedically dosed in digestive loving spice and harmonious food combining qualities (…I know it’s bold, but I’m going to just go ahead and claim that these are the worlds best, because to me, they ARE!)

Enjoy my loves and please let me know how you go by coming to say hello to me over on my instagram!

Meat-free Ayurvedic Plant-based Beetroot Vegie Pattie Recipe

Wholesome Ayurvedic Beetroot Garden Vegie Patties Recipe

(Gluten-free, dairy-free, egg-free, nut-free, sugar-free… totally delicious though!) 

Serves 1 person (this recipe makes 6 small yummy patties!) 

Ingredients:

  • 1 medium organic beetroot grated
  • 1 medium organic carrot grated
  • 1 medium organic zucchini grated
  • 1 small red onion finely chopped (optional if onion doesn’t agree with you!)
  • 1/2 cup of besan flour (chickpea flour)
  • 1/4 tsp of turmeric powder
  • 1/2 tsp of cumin powder
  • 1/2 tsp of coriander powder
  • 1/8 tsp of ajwain seeds (you can find these at asian/indian grocery stores)
  • 1/8 tsp of fennel seeds
  • 1/2 tsp of himalayn salt
  • a few cracks of black pepper
  • 2 tbsp of Coconut oil or Ghee for cooking

Creation Process:

  1. Add your grated beetroot, carrot and zuchini to a medium mixing bowl and mix them into each other using your hands so the three of them are well combined.
  2. Add your red onion, turmeric powder, cumin powder, coriander powder, ajwain seeds, fennel seeds, salt and pepper and mix through.
  3. Slowly add your besan flour (chickpea flour), stirring as you add it so that any clumps in the flour get broken up and properly integrated into the mix. Once all of the flour has been added, use your hands to ‘massage’ the mix, squeezing the mix inbetween your hands to allow the naturally occuring ‘water content’ of the vegies to form a nice ‘batter’ with the flour.
  4. Once it’s all well mixed, juicy and a good ‘Pattie’ forming consistency, you are ready to form your patties so they can be cooked. To ensure the patties stay together and form a nice shape that you’d want to eat, I recommend taking a small-medium amount of the mix and forming a ball with it in your right hand, then transfering it back to your left hand, and back again until its a nice well firmed morsel. Then to make it ‘Pattie-ish’ gently use your hands to press the pattie ball into a flatter shape suitable for cooking! You are now ready to cook the patties! Yay!
  5. To cook, allow your healthy non-stick pan** to warm for 2-3 minutes with a little coconut oil or ghee on the pans surface. Once it is warm, place your patties one by one on the pan and allow them to cook for 4-5 minutes before carefully flipping them over with a spatula to cook the reverse side.

**(If you’re looking for a good healthy non-stick pan, the one I use is the Pancake/Crepe pan by Neo-flam, I’m not paid to say this, I’m just a big fan so want to share the good pan love!)

And that’s it! You did it!!

You made the worlds best, Wholesome Ayurvedic Beetroot Garden Vegie Patties and are about to enter a whole new realm of digestive feel-good ‘goodness’, love, joy and simple soulful – nourishment satisfaction!

If you loved this recipe, please let me know over on my instagram and or by dropping me an email saying ‘Pattie love!’. …These are my favourite kind of emails to receive!

P.S. If you are interested in diving deeper into the world of Wholesome Ayurvedic Wholefood Nourishment, in your Kitchen then my new soon to launch 6-Week Ayurvedic Food & Lifestyle Transforamation program, ‘Simple Ayurveda in Your Kitchen’ could be just the next step for you!

…To find out more and be first to know when the doors open next, click here to enter your details and join the official course waiting list!!!


Yay and yesss to feel-good nourishment in life!!! 

Loads of wholesome love, joy and warm yummy delicious Kitchen wishes!


x Lorien 

Ayurvedic Split Moong Breakfast Dhal Recipe

Ayurvedic Split Moong Bean Breakfast Dhal RecipeBreaking your fast…

Dhal for breakfast!!??? Whhhhaaattt! I hear you say!

Yes, you can infact enjoy Dhal for breakfast – and if you’re a Dhal fiend like me, this news ought to bring you and your beautiful tummy great joy!

Breakfast is a meal where we are literally, ‘breaking’ a ‘fast’. If we are following a perfect Ayurvedic Lifestyle routine then eating dinner early in the evening, allows for the body to have a much needed fast, a period of approx 12+ hours of rest and rejuvenation infact, if you were to finish your evening meal by 7.30pm and have breakfast at approximately 7.30 or 8am.

So, since breakfast is the first meal of the day, after our digestive system has just been resting, it’s wise to eat something light, easy to digest and ideally warm in nature for the first meal of the day (after your morning routine of cleansing lemon and ginger water of course!)

Ayurvedic Porridge is a big breakfast favourite of mine, however sometimes it feels good to have a savoury option – something salty, hearty and protein-y for a change.

Dhal my friends, is a great answer for these savoury morning feels, and the best part is that you can make a batch of this up the night before and then simply heat it up on the stove for breakfast, (if you find that you are often time-poor when it comes to your morning meal, like I know so many of us often are!)

Not only is it convenient for breakfast, but it also makes a great easy and ready to go dinner meal as evenings are also a good time to eat light, warm and easy to digest soup – like dishes, and this Dhal certainly ticks all those boxes.

(Lunch is the meal that you want to make the biggest meal of your day in Ayurvedic medicine, as that is when the sun is the strongest and therefore your digestive ‘inner’ sun or fire, known as Agni is at its peak and can process a more complex meal more optimally.) 

Your frozen smoothie bowl might be making you hotter during summer!

Finally, for all my friends in summer right now, like I am, you might be thinking that it’s ‘too hot’ to eat Dhal this time of year, I am here to tell you otherwise. Not only is this delicious and healthy Ayurvedic Dhal appropriate for winter, it is also so great to eat during the warmer months of the year, and infact might even help you stay cooler.

When we eat warm foods our body doesn’t need to work so hard to digest, thus reducing heat being generated internally. When you reach for your frozen smoothie bowl however, you may be heating yourself up due to the extra work your system has to do in order to digest the food AND keep you cool at the same time! …Something the think about. :)

Ready to try a warmer approach to staying cool? Get the recipe for this delicious Ayurvedic Breakfast Dhal below… 

I garnished my Ayurvedic Split Moong breakfast dhal with a generous dollop of coconut yoghurt (to add creamy sweetness and dimension of flavour), a squeeze of fresh lemon (to aid digestion) + my new favourite locally grown summer green, lemon sorrel for freshness and a little bitter taste to cleanse and tone my liver!


Ayurvedic Split Moong Breakfast Dhal Recipe

*Makes approx 4 serves

Ingredients in order of usage: (100% organic wherever possible!):

  • 1 tbsp of coconut oil
  • 2 tsp of whole cumin seeds
  • 1/4 tsp of fennel seeds
  • 1 small red onion, finely chopped (100% optional!)
  • 1 tbsp of fresh ginger, finely chopped or grated
  • 2 tsp of ground coriander powder (I grind mine freshly in a coffee/spice grinder)
  • 1/2 tsp of turmeric powder
  • 1 cup of soaked, washed and rinsed Split Moong Dhal (I buy mine from Santos Organics!)*
  • 1 tiny pinch of pure asafoetida powder (this will add a lovely flavour, 100% optional though!)
  • 1.5 litres of filtered boiling hot water for cooking
  • 1/2 tsp ground black pepper
  • 2 tsp of pure himalayan salt or good quality sea salt
  • Coconut yoghurt of your choice to garnish, (make sure it is sugar-free! Read the label.)
  • Some fresh slices of lemon
  • Fresh seasonal greens to garnish; lemon sorrel, coriander, rocket, whatever you’re loving! :)
  • Your loving energy!

*To soak your Split Moong Dhal: Soaking allows enzyme inhibitors and gases present in legumes to be released, making the lentils easier to digest. Cover the lentils in a bowl of water and let sit for a minimum of 30mins, or for a few hours during the day. Once soaked, the lentils will have expanded/swollen. Take your lentils to the sink, and pour them into a strainer to give a thorough wash and rinse under cool water 3-4 times until they feel clean and well rinsed in your eyes. Sit the lentils aside, allowing the water to drain away and Voila, your lentils are now soaked and ready to go into the recipe.

(*Note: if you find that you only have powdered spices or only whole, you can exchange whole spices for powders and visa versa! It will just change the texture and flavour of the meal slightly!)


Creation process:

  1. Take a medium-large saucepan, add your coonut oil and place on a medium heat until coconut oil is warmed (or melted if it’s cold where you!)
  2. Add your cumin seeds and fennel seeds to the oil and using a wooden spoon, stir to toast the seeds, allowing the potent oils to be released into the oil.
  3. Add your chopped onion (optional), fresh ginger, coriander powder, turmeric powder and Asafoetida – and stir to combine the spices with the fresh onion and ginger until the onion softens and it feels well ‘toasted’.
  4. Add your soaked, washed and strained Split Moong Dhal to the pot and stir vigorously to mix the lentils with the spicey mix on the bottom. Stir for 3-5 minutes or until you feel the lentils are well toasted and starting to stick to the bottom of the pot.
  5. Add your boiling water (stand back for this as the oil and water can ‘spit’ at each other) then stir the water into the dhal.
  6. Turn up the heat to high and boil for 20 minutes, stirring regularly (adding your LOVE) and ensuring a nice even distribution of heat in the pot.
  7. Now you can add your back pepper and salt, place the lid on and reduce the heat to a simmer. Continue to simmer and stir for another 5 minutes, then turn the heat off and let sit with the lid on for 5minutes.
  8. You will know your dhal is cooked when it has reached a smooth soupy consistency (try adding more water if you feel it looks too thick at any point) and the lentils are no longer separate, they have become ‘one’ with each other! So spiritual indeed! :)
  9. When you are ready to serve your beautiful Dhal, scoop the desired amount into a bowl, add a dollop of your favourite coconut yoghurt, a sprinkle of black pepper, squeeze of fresh lemon and some freshly chopped leafy greens or herbs!
  10. Finally, before eating, take 3 deep breathes, say a quite inner prayer of gratitude and enjoy savouring each mouthful of this dhaaalicious easy to digest Ayurvedic savoury breakfast!

Enjoy this recipe and may your breakfasts be delicious, or should I say, dhaaalllicious for ever more!


x Lorien

Ayurvedic Split Moong Bean Breakfast Dhal Recipe

Vegan Savoury Buckwheat Moon Wraps Recipe!

savoury wheat-free buckwheat wraps

The best wheat & bread alternative since… well, before sliced bread!

Organic Whole Foods, filled with innate wisdom and intelligence (for our beautiful bodies) from nature is where it’s at!!!

…One of the hardest things for many to give up and find satisfactory wholesome replacements for when switching to Whole Foods and wanting to clean up their diet is WHEAT and breads and bread-like products made from gluten and wheat.

I totally get it. We are often brought up eating it for breakfast, lunch and often dinner.

Regular (processed wheat, pesticide laden, nutrient devoid) bread has culturally become a staple in the west and sadly is heavily marketed to us by big companies as being highly nutritious, (think ‘wonder white’etc) when the plain, honest real truth is that it is the total opposite. It’s essentially like poison to the body due to the chemical pesticides these grains are grown with as well as the over-agriculturalisation of the grain in general ~ sadly making wheat today devoid of the goodness it once contained in the past that allowed our bodies to recognize and draw nutrients from it.

This literal stripping of goodness that has occurred over the last 100+ years is why so many now experience inflammation, swelling and gluten-intolerance when it comes to eating this major western staple.

So, what ‘bread’ and grain you’re eating is a big area to look into when exploring your health and wanting to heal your body and digestive system. Especially important for anyone currently experiencing high inflammation/join/skin/gut/anxiety issues.

So, this is why I for one am so over the Buckwheat Moon! to share this incredibly simple and easy recipe for making your own home-made wholesome wraps, pancakes, flat bread, roti, chapatis, naan and… whatever else that is flat and bread-like that you wish to find a wholesome alternative for!

Hello Buckwheat. 

Hello Savoury Buckwheat Moon Wraps!

P.S. Even though the name, ‘Buckwheat’, has the word ‘wheat’ in it, I want to ensure you that Buckwheat is not wheat at all, and is 100% gluten-free. Another interesting fact about this amazing wholefood is that while it is used like a grain in cooking, it is actually technically a ‘seed fruit’, not a grain, making anything you make with 100% buckwheat, not only wheat-free, but also ‘grain-free’. 


Vegan Savoury Buckwheat Moon Wraps Recipe:

(This recipe will make approximately 6 x large, thin wraps.)

Ingredients:

  • 2 x cups of Organic Buckwheat flour
  • 4 x cups of room temperature filtered/spring water
  • 1/2 a tbsp of Organic Potato Starch
  • 1/2 a tbsp of Organic Tapioca Flour
  • a pinch of sea salt
  • some organic coconut oil for seasoning your pan
  • of course, the most important ingredient, your love!

To Make Your Wrap Mix:

  1. Place Buckwheat flour in a medium mixing bowl and make sure you smooth out any lumps with the back of a wooden spoon or through sifting, (so your mix is nice and smooth).
  2. Next add the Potato starch, Tapioca flour and salt. Mix these into the buckwheat flour until well combined. 
  3. Slowly begin to add water, stirring slowly to gradually mix the liquid in with the flour. Mix until water and flour is well combined and forms  a smooth, runny, fall of the spoon consistency! 

Cooking your Wraps: 

  1. Warm a healthy non stick pan, and add a dash of coconut oil to help the cooking process.
  2. Using a ladel, pour a spoonful of your mix into you pan and quickly lift the pan of the heat to move it around, ’spreading’ the wrap mix around the pan to ensure it is thin and a nice big circle!
  3. Cook on one side until little air pockets show through from underneath, then using a spatula, flip to cook the other side for 2-3 minutes or until looking cooked.

That’s it. So SIMPLE!

You now have a beautiful, soft, digestive friendly, nourishing and wholesome Buckwheat moon wrap to enjoy immediately or to store in an air tight container for making lunches the next day! :)

The key to making a good wrap that you can put tasty delicious fillings into is to make it thin, flexible and supple (i.e.: unbreakable once goodies are inside)!

You’re in luck as with the recipe above, I’ve done the work of ensuring your mix is ‘unbreakable’ for you, so you can relax and simply enjoy some super versatile, wholesome, buckwheat wrap love in your life!


Making a thicker / Roti / Naan like bread from your Wrap mix:

The key to making your buckwheat moon wraps into more of a roti / naan like bread to go with soups and curries is to add slightly less water to your mix, so that the ‘wraps’ are  thicker. To do this I recommend:

  • Experimenting with using only 3 cups of water, rather than 4
  • Adding slightly more coconut oil (or ghee) to your pan while cooking them, to get them more toasty and buttery
  • To get some ‘air’ into the wraps, giving it a flakey/more roti like consistency, press your spatula onto the already cooked face up side of your wrap (once you’ve flipped it once) while cooking to encourage air bubbles and pockes to move around, helping make it more ‘bready’ and crispy.

wheat-free. gluten-free savoury buckwheat wraps. the best thing since before sliced bread!

…I’ve been a Buckwheat lover my whole life, (forever thankful to my awesome alternate, wholesome-nutritionist Mum!) So, as you can imagine, making buckwheat pancakes has been something I’ve loved doing forever.

Lately, while doing some kitchen experimentation (…which is ALWAYS happening, as I just love exploring new ways of doing things and new wholesome tastes, flavours and solutions for good nutrition) I stumbled upon this wrap mix/concept. Needless to say (from everything you’ve now read above), I got a bit excited about this development, and in particular, about how versatile something so simple, nourishing and wholesome like this can be, esspecially for families with making school lunches etc!

During one of my morning buckwheat feasts the wrap was born, and the photo above shows you the ingredients I prepared to go inside the wrap. The filling.

You can put anything you like inside a wrap obviously, it is a blank canvas for your nourishing tasty pleasure…

Incase you want to know what I put in (which tasted great!) I will list the items here for you to give you some inspiration!

  • fresh avocado with lemon juice 
  • fresh alfalfa sprouts (so yum!)
  • finely grated beetroot and fresh basil from the garden (herbs are excellent and add ‘wow’ factor!
  • fresh organic leafy green leaves
  • home-made sesame tahini dressing/sauce (tamari, toasted sesame oil, lemon juice, dash of maple!)
  • sauteed asian greens + vege (red onion, ginger, garlic, turmeric, wombok cabbage, silverbeet, red capsicum, brocolli) 

I hope this recipe brings you and your family endless wholesome Buckwheat Wrap love and joy! 

If you try it and love it, please let me know and help spread the word by sharing with others who may appreciate having this simple, delicious, wheat-free wrap goodness in their lives also!


With love & warmest gratitude,


x Lorien


Ayurvedic Rituals to Cultivate Self-Love!

Photo of Lorien Wadron, taken by Shatanu Starick

“It is through the alignment of the body that I discovered the alignment of my mind, self, and intelligence.” ~ B.K.S. Iyengar

To have love to share, we first must cultivate a juicy bank account of love inside of ourselves.

Sometimes this is easier said than done as when there are a million things to be done, children to feed, emails to respond to, appointments to fit in and a plethora of other activities surrounding your day-to-day routine, it can sometimes feel impossible to make time for self not to mention the practice of some juicy daily self-love & care.

This is where the power of setting yourself up with a few simple daily ‘Rituals’ to support you, your yoga practice and your self-love bank account – can make your life a whole lot easier and more delicious!

There is no limit to the amount of daily rituals you can seamlessly weave into your day. You most likely already have a whole bunch such as showering, brushing your teeth and making your morning cup of tea, coffee or green smoothie.

Rituals are magical as they allow us to honour what is sacred. Devoting 10-20 mins of your time morning and night to some sacred ‘you’ time is all it takes. Your body is a sacred temple. When you love your body, it will love you back ten fold.

5 Ayurvedic Rituals for cultivating more self-love on a daily basis

1. The 7 minute Morning Self-love Massage – warm a small bottle of cold pressed black sesame oil or coconut oil up in hot water and massage your whole body for 5-10 minutes before having a shower to move your lymphatic system, boost your immune system, hydrate your skin and give your beautiful body some juicy self care and love.

2. Daily Devotion – Nourish your mind and spirit daily with stillness, surrender and connection. A daily practice of your own form of prayer and meditation is nourishing for your inner self.

3. Create your day – set intentions at the start of each day to create a context for your day that inspires you. We attract what we put out. Start your day with clarity and focus for your body, mind and spirit.

4. Massage your feet – make a habit of massaging your feet with an organic non-toxic body cream, body butter or sesame oil each night before bed. The reflex points in the feet have the power to relax your whole nervous system, which leads to a deeper sleep and soft beautiful feet!

5. Journal + let go, daily! – mental digestion is just as important as physical digestion. Create a habit of writing your thoughts down, expressing your feelings and reflecting on the day before you go to bed. This practice is powerful for cultivating self-love and receiving guidance that will assist you and prevent stress from building up.

Happy nourishing and self-loving!

x Lorien

Wholefood Hazelnut Carob Dream Recipe – The best Chocolate Milk ever!

If you’ve been following me for a while, you may know that I have a major soft spot for Carob that goes back to childhood! It was the ‘chocolate’ of choice that my Mum would buy for me, and amazingly enough the wholefood ingredient of Carob itself is still one of my favourite creamy, sweet wholesome foods when I feel like a treat!

So, what exactly is Carob?  Besides being one of the most delicious earthy flavours/foods on earth, it is a legume ~ a bean that grows on a tree and is native to the Mediteranean and The Middle East. It grows in Australia among other dry warm climates and is one of the only known trees that can withstand severe drought without dying. It is a hearty, strong and resilent tree!

Being a legume, Carob is quite high in plant based protein, making it a great ingredient for Vegans and Vegetarians to incorporate into home-cooked recipes for extra oomph. Aside from it being nutritious, Carob is naturally sweet and creamy and when the bean is roasted and made into a powder, it is the perfect subsitute to Cacao or regular Cocoa powder for making Chocolate. It can even be a great substitute for sugar, as it has such a beautiful natural sweet taste.

Do you or your kids love Chocolate Milk, but want a healthier, cleaner, more nutritious option?

Well my friends, I have just the thing for you!

Hazelnut Carob Dream ~ aka: the best Chocolate Milk ever! 

It’s super simple to make, will keep in the fridge for 2-3 days after making and requires only four ingredients.

Ingredients:

  • 2 cups of soaked hazelnuts
  • 1/4 tsp of sea salt
  • 2 heaped tblsp of roasted carob powder
  • 4 cups of water (filtered water or spring water)
  • *a piece of cheese cloth or a nut-milk bag for straining the milk once blended. (Ask your local health food shop, most shops stock these bags.)

To make this delicious milk follow the following simple steps:

  1. Add soaked hazelnuts to your blender
  2. Add water
  3. Add sea salt
  4. Now blend on high speed for 2-3 mins
  5. Place your cheese cloth or nut bag over a large jar or jug.
  6. Pour the contents of the blender into the bag/cloth and strain out the fibre, so you just have the milk in the jar/jug.
  7. Once strained, place the solids to the side (you can reuse these in another recipe or compost them.)
  8. Next add the milk back into your blender to ‘Carob-ify’ it! :) Add your roasted carob powder and blend for 2-3 mins until blended and smooth.
  9. Next pour into a clean glass bottle or jar and drink or store in the fridge for when you feel like a smooth creamy snack!

Voila! So simple SOOOO and easy!!  Try this at home!

Nourishing, creamy, healthy and delicious.

Enjoy!!

With love and wishes of goodness to you and your family!

x Lorien

Simple Ayurvedic Split Moong Veggie Dhal!

Ayurvedic Dhal and Rice Picnic

Simple Ayurvedic Split Moong Veggie Dhal with handfuls of fresh coriander!

A dhhaaalicious simple, easy and oh so yummy meal to make for friends, family and loved ones for a non-traditional Christmas lunch or dinner that will nourish your belly and warm hearts!

Split moong is a staple in any Ayurvedic Kitchen and can be made into Dhal like this one here or ‘Kitchari’, by simply cooking the rice and split moong together in the 1 pot, (which is the recipe you’ll find inside my E-book.)

I’ll let you in on a little secret, …the cooking process for making Kitchari and Dhal is virtually the same, Dhal is just made without the rice! 

It’s mostly steamy hot, beachy balmy summer days here in Australia for Christmas, there certainly isn’t much snow falling however whether you’re in the tropics or in a winter wonderland right now… This light and nourishing clean wholesome Dhal will likely hit the spot (and the ingredients are super affordable, which is certaintly a bonus this time of year!)

Yum! Share the dhalll love this festive season! :)  Everything tastes more delicious and nutritious when shared!


Simple Ayurvedic Split Moong Veggie Dhal Recipe       

Ingredients: 

  • 1 cup split moong beans soaked for 1 hour and strained
  • 5 cups boiling water from the kettle
  • 1 tbsp of coconut oil
  • 1 tsp cumin seeds
  • 1 tsp whole coriander seeds
  • 1/4 tsp fennel seeds
  • 1 tsp finely chopped ginger
  • 1/2 tsp turmeric powder
  • 1 tsp sea salt
  • A few cracks of black pepper
  • 1/2 cup finely chopped fresh coriander (or more!)
  • 1/2 cup of diced and skinned pumpkin
  • 1/2 cup of diced carrots
  • Spoons of your LOVE!

Method:

  1. Warm  coconut oil in a saucepan on medium heat then add dry spices; cumin, coriander and fennel seeds. Stir to lightly toast the spices for 2-3 minutes or until they start to sizzle.
  2. Add fresh ginger and turmeric powder. Sauté for 2-3 minutes.
  3. Add the split moong beans and ‘toast’ by stirring the moong into the spices before adding any water.
  4. Next add the chopped pumpkin and carrot. Stir the vegies with the lentils for 3-4 minutes or a bit longer, you’ll know it’s time to add water when the lentils start to get sticky on the bottom of the pot.
  5. Immediately pour your boiling water into the pot at this stage to prevent sticking and bring to the boil for approx 10 minutes.
  6. Add sea salt and black pepper. Stir continuously to bring out the creaminess of the lentils and the veggies.
  7. Turn heat down to medium and simmer with the lid on for approx 20 minutes or until the lentils and veggies become smooth, soft, ‘dhaly’ and creamy.
  8. Once cooked add a generous handful of freshly chopped coriander and stir into the dhal. Serve with a side of steamed basmati or brown rice, a generous garnish of fresh coriander and a squeeze of lemon for extra digestive goodness and tang!
  9. Voila! So easy, so creamy, so dhaaalicious and tummy nourishing!

Enjoy the recipe for this scrumptious dhal and make sure you share the

#wholesomelovinggoodness

by tagging me in your dhaaaalicious photo’s!

Merry Christmas and oodles of love and joy to you and all your loved ones for the holidays! 

x  Lorien 

SaveSaveSaveSaveSaveSaveSaveSaveSaveSaveSaveSave

SaveSave

SaveSave

Delicious Ayurvedic Coconut Quinoa Porridge Recipe

15380691_1206221002819269_2853906234467970026_n

This morning I woke up to a winter wonderland outside. Fresh snow 13cm’s deep on the front lawn, backyard and basically everywhere one could look! There was snow on the roof, snow covering the footpaths and snow covering the entire road.

This morning the snow melted my heart with it’s softness and delicate beauty… It is really so so beautiful to see, touch and experience.

Breakfast is always a time of the day that I look forward to and love. It is a time for warming our digestive system, kindling our inner fire and breaking the fast that we gave our body while we slept.

Ayurvedic Porridge is my go to. I have adapted the original Ayurvedic porridge recipes that my teachers tought me over the years to suit my body, digestion and the food quality and lifestyle we have available to us today in modern day society.

Traditionally Ayurvedic porridge is often made with lots of ghee, un-homogenised organic milk, semolina and jaggery to sweeten. These are all beautiful ingredients and substances in their essence, for the qualities and nourishment they represent however in this day and age the quality of these ingredients is not always reliable and for many can create feelings of bloating, congestion and heaviness after eating.

The recipe that I made this morning is very very similar to the Ayurvedic Porridge recipes in my E-book, (which is full of recipes and lifestyle wisdom that is sugar-free, vegan-friendly & gluten-free!) For those who have my book, you can use the same recipe as in the book however adapt it slightly to add these new elements of coconut milk and pumpkin seed butter!

This porridge recipe is VEGAN. GLUTEN-FREE. WHEAT-FREE & DAIRY-FREE! :) …Yes, I really just want you to feel FREE to enjoy your day and your tummy after eating it!

So, let’s get to the recipe!!!

Delicious Coconut Quinoa Porridge Recipe

Ingredients:

  • 1 tsp of coconut oil
  • 1 cup of quinoa flakes
  • 2 cups of boiling water (boil in your kettle)
  • 1 tsp of cinnamon powder
  • 1 tsp of cardamon powder (or 3 whole pods)
  • a pinch of fennel seeds
  • a pinch of himalayan pink salt
  • 5-10 juicy thompson raisins
  • 3 blanched almonds
  • 1 tsp of pumpkin seed (or almond) butter
  • 2 tblsp of coconut milk
  • your love!!!

Creation Process:

  1. On a medium heat melt the coconut oil in the bottom of your porridge pot
  2. Add the quinoa flakes and stir continusly, toasting the flakes in the coconut oil and bringing out their goodness and flavour! (Don’t leave the flakes or they will burn.)
  3. Once toasted to your satisfaction, stand back and pour boiling/hot water into the pot to moisten and hydrate the flakes. Stir continusly until the water and flakes are mixed.
  4. Add your spices; cinnamon, cardamon & fennel and stir.
  5. Add the raisons and stir for another 5-10  mins until the quinoa flakes are cooked and the porridge is a smooth creamy consistency.
  6. Once ready, take away from the heat and serve in your favourite breakfast bowl.
  7. Pour coconut milk around the bowl, add a dollop of pumpkin seed butter and finish with a few blanched almonds for extra yumminess!

Voila! You did it! A delicious sugar-free and vegan wholesome nourishing brekky for Wintery mornings in the snow OR summery mornings at the beach! :)

…That’s the beauty of porridge, you can eat it any time of the year and any time of day for that matter!

With love from snowy Toronto, Canada!

Oh, and if you want to dive into more wholesome simple recipes this festive season, make sure you check out my 108 page E-book, Simple Ayurveda in the Kitchen! It is a complete guide to intuitive eating, digestion, food combining, self-love and Simple Ayurvedic Cooking to suit this modern day and age!

x Lorien